
HAXM Installation Failed message while installing Android studio :
The Android Studio Installs Intel HAXM when you install Android Studio. But you may get the HAXM Installation Failed message because of the following reasons :
1.) Android emulator is already running
2.)The processor is not Intel-based
3.)Unsupported OS
4.)Hyper-V Manager must be disabled
5.)Virtualization must be enabled in Bios ( VT-x )
6.)The PC must support Virtualisation
7.)Antivirus (Avast) may interfere with HAXM Installation
While starting Android studio shows “HAXM is not installed on this machine ” so you can install like mentioned below :
Open SDK Manager and download Intel x86 Emulator Accelerator (HAXM installer) if you have not.
Option 1: Go to Android SDK Folder –> Extra –> Intel and double click on HAXM installer and install it manually.
Option 2: If you do not have latest version of HAXM then you can open sdk manager in android studio and download it. Go to Android SDK Manager (Tools -> SDK Manager) and select SDK Tools. You will find the Intel x86 Emulator Accelerator HAXM installer listed here. Select it and click on OK.
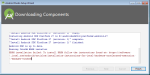
Error :
In my case,i got the HAXM Installation Failed error as follows :
Fix:
Disable the Hyper-V Manager did the trick for me.
Hyper-V is another Virtualisation technique just like Intel HAXM. You cannot use both at the same time. Hence, It is necessary to Disable Hyper-V. You can follow these steps to disable Hyper-V
- Go to Control Panel -> Programs and Features -> Turn Windows features on or off
- From the window disable Hyper-V options
- Reboot your machine
Disabling the HyperV fixed the HAXM Installation Failed issue for me.
